
Frequently Asked Questions
Here are some of the questions we get asked most often. More will be added as they arrive!
( Open All Close All )
Lightroom
I bought the plugin but it's still in demo mode.The plugin license keys are all specific to the email address that was used to buy them in PayPal. For the Alamy plugin, the email address you gave as your Alamy login is used instead.
To enter the license correctly, you need to use exactly the same email address, including the same case, as your PayPal account. In Lightroom, open the Plugin Manager and highlight the appropriate plugin. You will then see text boxes for your email address and license key. Enter them exactly as in the email and click OK.
There are graphic instructions for doing this at here.
If a license is not being accepted then please make sure that you are running the latest version of the software by downloading it again from the website, either from the original product page or from the "Downloads" page.
http://kb2.adobe.com/cps/333/333660.html
If you want to clear your settings, you can remove the "Lightroom x Preferences.agprefs" file. This will reset Lightroom to all default settings.
You can temporarily clear your settings by simply renaming the same file. Lightroom will create a new one when it is next run. To revert to your original settings, delete the new file and rename your original copy.
All current versions of Windows support automatic compression on NTFS filesystems. All you need to do is switch it on.
- Find your backup folder using "Edit->Catalog Settings", then clicking on "Show". The folder that gets opened should have a sub-folder called "Backups".
- Right-click on "Backups" and click on the "Advanced" button.
- Set "Compress contents to save disk space" to "on", and then click "OK" and "OK" again.
- A window will appear asking how you want to apply the changes. Select "Apply changes to this folder, subfolders and files".
Now any file that gets saved into the Backups folder will automatically be compressed. You don't need to do anything to decompress them, Windows takes care of it for you.
There is reportedly a similar feature in Snow Leopard : http://www.macosxhints.com/article.php?story=20090902223042255
Most of the plugins here are tested and compatible with Lightroom 2.2 and up, although many now require at least Lightroom 4. New versions of Lightroom will be tested as they appear.
They are not compatible with the new cloud-based version of Lightroom, which is a very much cut-down program compared to what is now called "Lightoom CC Classic".
If you paid using an eCheck, please note that PayPal does not clear this immediately and therefore it may take several days before the license is issued.
We often have problems getting email delivered to people on att.net and pacbell.net . If your license email does not arrive, please use the helpdesk and retrieve it from there if you did not take a note of it immediately after the sale.
Before March 2015
Before March 2015, all upgrades are free. However, due to increasing support demands I have reluctantly decided to follow the common practise of charging a small amount for upgrades.
After March 2015
After March 2015, upgrades are free for one year after you buy your license. Your license does not expire, ever. You will be able to use the version you paid for, and any versions released in the following year, indefinitely. After the first year you will be asked to pay a token amount if you want to use the latest version of the software. This will then give you access to the latest version, and all updates in the following year.
The automatic update check built into all plugins built after February 2015 will tell you if a newly released version comes within your free support period. To extend your license to cover the latest versions of the software, please log into the helpdesk using the email address that the license was issued to and visit the "Licenses" section. From here you can view and extend your existing licenses, or buy new ones.
If you bought your license in the year preceding March 2015 and you are using one of the Lightroom plugins, you can use the "Retrieve License" button in Lightroom's Plugin Manager to have a new license which is valid for the correct period emailed to you automatically. If there is no "Retrieve License" button then your plugin is older than March 2015; you can choose to keep using that version indefinitely, or update to the latest version and then request your new license.
Once you start using Lightroom seriously you should start to think about backups. It's possible to get Lightroom to back up your catalog periodically, but this is only the catalog and not the photos themselves.
Backing up to the same disk that your catalog is on doesn't really help in the worst-case scenario, when the entire disk is lost or damaged. In this situation you will want to have what's called an "off-line" backup - that is, one that exists outside of your computer.
One way is to buy a good-sized external disk and back up to that. Both Windows and Mac offer built-in backup options, and if you buy a new external disk then there is a good chance that it will come with backup software included.
The safest option is to backup to a server somewhere else, or "the cloud". While no service is infallible, data loss with a cloud backup provider is rare enough to make the news so they're as safe as it's possible to get. There are various options out there, the highest profile ones being Rackspace and Amazon, but they work out to be fairly expensive if you read the small print, especially if you're backing up and storing large amounts. It's usually possible to get better deals from resellers, such as www.gotabackup.com . Look for one that has live support so that you've got someone to talk to if you need to.
Once you've got all your photos and the catalog stored somewhere else, even if the worst happens you don't need to worry about losing your photos and Lightroom catalog.
I will issue refunds in cases where the software is not functioning as designed, and a reasonable attempt has been made to correct the problem without results. If you have problems, as a first step please follow any instructions in the online Troubleshooter. If that fails, next contact me with a support ticket.
All software available here can be used in a trial mode without making a purchase. Please make sure that you evaluate the software before buying. Licenses are not sold on a trial basis.
If you're having trouble with one of the plugins not behaving as it should, you may be asked to provide a logfile to help track down the issue. All logs can be found in your Documents folder, both on Windows and OSX. The name of the logfile is usually guessable based on the plugin name:
Plugin |
Log Name |
| Alamy | AlamyExport.log |
| Cache Manager | CacheCleaner.log |
| Duplicate Finder | FindDupes2.log |
| PhotoPhile | iThingPublisher.log |
| Map Web Publisher | LR_MapEngine.log |
| Merge Titles | MergeTitles.log |
| Backup Cleaner | RemBackups.log |
| SoftProof | SoftProof.log |
If you are having trouble with one of the Lightroom plugins, you may be asked to send a debug log in to support. These will contain a lot more detail than the normal logging that's done but can really help to isolate and fix problems quickly.
- Open Lightroom's Plugin Manager from the File menu.
- In the list on the left, choose the plugin you want to put into Debug Logging mode.
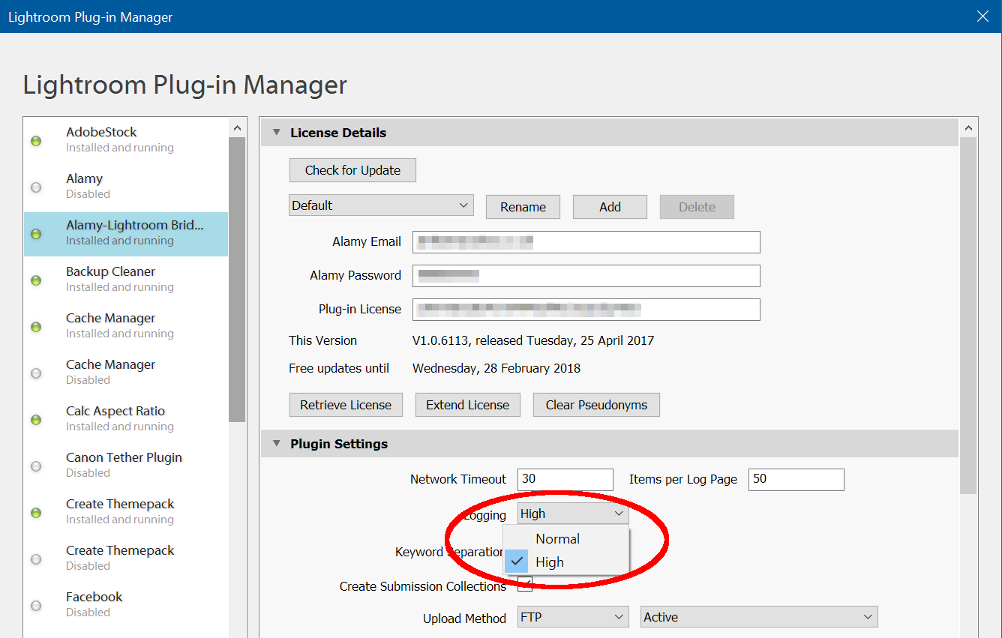
- Expand the "Plugin Settings" section on the right, and use the "Logging" dropdown box to choose the "High" option.
- Do whatever it is that is failing once more, to create the logfile.
- Send the logfile in to support.
The logs are by default created in your Documents folder. Each plugin creates a logfile with a different name. Some are listed below; if the one you need is not in the list, look in your Documents folder for the most recently modified file. They are plain text files, so you can open them in any text editor if you want to check what is being sent.
Plugin |
Name of Log File |
| Alamy | AlamyExport.log |
| Preview Cache Manager | CacheCleaner.log |
| Duplicate Finder | FindDupes2.log |
| PhotoPhile Sync | iThingPublisher.log |
| Map Web Export | LR_MapEngine.log |
| Windows 7 Themepacks | Make7Theme.log |
| Caption Helper | MergeTitles.log |
| Backup Cleaner | RemBackups.log |
| SoftProofing | SoftProof.log |
This error can happen in a number of different places across all plugins. In short, the plugin has tried to open a file on your disk and not been able to.
The actual cause should always be displayed as part of the error dialog itself and will usually help you to work out what is wrong. Common causes would be that the file simply doesn't exist if you're trying to read it, is already in use by another program, or if you're trying to write then the place it's being written to is not allowable or your disk is full. Using a different filename if you have a choice, or clearing some space on your disk if it is full, will fix this problem.
If any plugin reports an "internal error", there is a good chance that this is a fault which should never happen. Please report this to support, and give as much detail as you can about what happened:
- Which plugin you are using - you'd be amazed how often this is missed!
- What you were doing at the time
- If possible, a screenshot of the actual error dialog. Lightroom itself can also show similar errors and this lets us tell whether it's the plugin or Lightroom.
- If possible, the plugin's log file, ideally on "debug" or "high" logging. This can be set in Lightroom's Plugin Manager, and the logfile is stored in your Documents folder.
If a plugin complains that it is unable to read XML data, it is almost certainly because the data is damaged. This error message can happen in a number of different places.
If the plugin was downloading data from the web it is possible that it was a temporary network problem. Also possible, and more likely, is that it was a problem with the server that the plugin was communicating with. Either way, please let us know about the error.
Alternatively, if the plugin was reading a file already on your disk, check the contents of that file are valid XML and make any fixes necessary. There are several XML validation tools available online, or as programs you can download and install. Just search for "XML validator".
Several of the plugins need to talk to online services. Sometimes this communication can fail, and it is almost always down to a slow or unreliable network connection.
The fix is to simply try again later, or from a more reliable network. You can easily test connectivity by using a normal web browser to visit a relevant website, such as www.alamy.com for the Alamy-Lightroom Bridge or www.lightroom-keywords.com for the AI Keywording.
The Alamy-Lightroom Bridge needs to send data to Alamy's servers and, in the case of new images, this can be very large and take a long time. On a slow or unreliable network connection, it is possible for there to be problems during this upload. Even when you are only uploading new metadata, the same problems can happen.
The simple fix for this is to try again later, or on a more reliable network.
Duplicate Finder
No "Find Duplicates" menu itemIf this doesn't help, check to see that the plugin is enabled.
1) Open the Plugin Manager (from the File menu)
2) Look for a "Find Duplicates" entry on the left
3) If it's not there, use the "Add" button at the bottom to find the plugin and add it.
4) Check for a green dot next to the "Find Duplicates" entry.
5) If it's grey, you need to enable the plugin. Select the plugin and click the "Enable" button on the right, in the "Status" panel.
It checks the capture time, camera serial number and ISO rating by default. You can choose to also match several other fields which will probably be the same for duplicate images.
If you're sure you have two images which should be matched, please open a ticket and attach the two images so that we can check why they're not being matched.
It's not possible to delete a photo directly from the "Smart Collection" because Lightroom only offers the option to remove photos from the collection, not to delete them. There is an easy alternative though, which is to use the "Flagging" system to mark which images you want to delete.
To do this, you select the images you want to remove and then either use the small black flag icon below the thumbnail area, or simply press "X" on the keyboard. Each of the selected photos will be marked as "Rejected", with a black flag icon. You can then select some more and reject those in the same way.
Once you have finished, switch back a view of the normal Library, for example by using the context-menu's "Go to Folder In Library" command. Now, use the "Photos->Delete Rejected Photos" menu item. Normally you would leave at least one from each set of duplicates as not rejected, because the "Duplicate Pictures" Smart Collection will show all matching images. If you reject and delete the entire contents of the "Duplicate Pictures" collection you will remove all copies of any photo which has a duplicate.
The plugin doesn't automatically select duplicates because it has no way of telling which copy you would want to keep.
This has been reported to Adobe and is currently under investigation.
In the meantime, there is a workaround available in some cases. The "Library Filter" feature is still able to search plugin data, but it doesn't allow a specific field to be searched. This workaround will only be useful if there are no other active plugins which define metadata.
- Run the duplicate search as normal.
- Define a Library Filter as "Text", "Any Searchable Plug-in Field", "Contains", "0 1 2 3 4 5 6 7 8 9". The last entry should have spaces between each number, but no quotes.
- The main Library thumbnail display should now show only those photos which have a plugin ID defined. This is essentially the same thing that the Smart Collection does.
This Smart Collection must be set up manually as part of installation. The full instructions for doing this are on page 4 of the manual. Briefly:
1) Go to the Collections panel in Lightroom and right-click to show a menu.
2) Select "Import Smart Collection Settings" on the menu.
3) In the file dialog, find the plugin's folder (full details in the manual, this can vary across different operating systems).
4) Load the appropriate Smart Collection definition depending on whether you are using Lightroom 2 or 3.
There is no fixed limit in the plugin, but because of the way that Lightroom works it will use a lot of memory if you get it to scan a very large catalog for all duplicates.
In this situation, it would need to perform a large number of searches and this would take Lightroom days to complete. Instead, it creates its own indices which are much faster to access, but unfortunately do use lots of memory.
To work around this, scan the catalog in batches. Pick a group of photos and search for duplicates of them. For particularly large catalogs you may need to search only within the groups at first, and then in the entire catalog later once you have reduced the overall number of images.
As a rough guide, it is tested on machines with 4 and 6Gb of memory against a catalog with roughly 15,000 images, and will perform a full scan in a few minutes. I know of places running it against catalogs with many tens of thousands of images.
The plugin will identify all images that are likely to be copies of each other, based on the image metadata. Many people ask why it doesn't automatically delete duplicates, or why it doesn't exclude the original.
This is simply down to safety. For a commercial photographer, losing a valued original image may be disastrous. Would you really want a bit of software deciding which photo to delete based on some kind of pre-written rule?
Suggestions have included:
- Keep the one with the shortest name, assuming that duplicates will have a number or "copy of" in the name. So, we delete "Photo (Original).jpg" and keep "Photo (Web).jpg". Wrong.
- Delete JPEGs, keep the RAW. But what if you shoot in JPEG? What if you convert to DNG and use that as the master, and the RAW is the one you would want to get rid of?
- Keep the oldest one, on the assumption that the oldest is the master. So, we delete the one to which you have made loads of production edits and keep an early preview you exported for your client. Wrong.
- Keep the newest one, on the assumption that it will be the one with the most work done to it. So, we delete the older original and keep the web-sized, watermarked export you prepared for a customer. Wrong.
- Keep the largest one, on the assumption that all smaller ones are previews. So, we delete an original scanned copy and keep a resized-for-printing copy with a banner across it. Wrong.
In short, no matter what rules you have for identifying which image is the "original" and which are "duplicates", there will be someone else who does the opposite. The plugin will help you to identify which images to look at by eliminating most of your library, and letting you display only the potential duplicates next to each other. You can then use Lightroom's own tools to identify, mark and delete any that you don't want, according to your own rules.
Since the duplicate finder works by looking at the image metadata, it is possible for it to detect pictures taken very close together as potential duplicates. This is because the timestamp recorded against a photo is only accurate to the nearest second.
If you are bracketing, there would normally be one or more of the exposure or aperture different between your bracketed shots, so provided you use these when searching for duplicates they should not be found. Sequences of shots taken without bracketing, such as in high-speed shooting mode, may well have the same settings and so will appear to be duplicates to the plugin.
If you intend to keep more than one shot from each high-speed shooting sequence, you can mark individual photos as 'not a duplicate' by setting the "Duplicate Search" to "No" in the "All Plugin Metadata" panel. This will prevent them from being picked up in future duplicate searches.
One of the options in the Find Duplicates dialog is to ignore virtual copies. Most of the time this works as you would expect - virtual copies aren't shown in the "Found Duplicates" results.
There is an exception to this though. If you are searching "For Selected Photos", it doesn't really make sense to immediately ignore one of the photos that you have selected - possibly the only photo you have selected. So, in "For Selected Photos" search mode it is possible to have virtual copies showing up in your results even though the "Ignore Virtual Copies" box is ticked. For this to happen you would have selected a virtual copy to search for, and a duplicate of that virtual copy must have been found.
Any photo can be explicitly excluded from a duplicate search by setting "Ignore in Search" to Yes, or by setting a keyword that you then tell the plugin to exclude. However, in some cases, these photos can still show up in a duplicate search.
These options tell the plugin never to match this photo when it is identified as a duplicate of a photo that it is searching for. In other words, the decision on whether to exclude a photo comes after a photo has been identified as a duplicate of another photo. When you search "For Selected" or "Within Selected" photos, all photos that you select are searched for even if they've been set to "ignore", simply because if you've requested a search for a specific photo then that search should run.
In short, ignored photos will never be considered as a duplicate of another photo, but may themselves be searched for if you explicitly select them.
Normally the Duplicate Finder should complete quickly, and give you a progress bar in the top left of Lightroom's window to show you what's going on. It's impossible to predict exactly how long it will take to complete on any given catalog and computer, but as an indication it will search a catalog of around 20,000 photos in just over 30 seconds on a fairly average Windows PC.
Delays before or during the search
If it takes much longer than this then the first thing to try is to optimise your Lightroom catalog. There's an option to do this on Lightroom's "File" menu.
If that doesn't help then the next most likely cause is lack of RAM on your computer. This is easy to check, by opening "Task Manager" (Windows) or "Activity Monitor" (OSX). If your computer is showing very high CPU activity then it should be fine. If it's showing very high disk activity then you are probably a bit short on memory. If you expect to be able to clear a lot of duplicates out after the first run of the plugin, it's probably best to just wait it out. Otherwise, upgrading the RAM is always a good option, and usually fairly cheap to do.
Delays after the search
Once the search has completed, everything from this point on is done by Lightroom itself. There have been very rare reports of Lightroom taking a long time to display the results but this only seems to happen with extremely large numbers of duplicate matches - around 150,000 duplicates or higher on an average PC. Unfortunately this is all handled entirely by Lightroom itself and the only way to resolve the issue is to search on smaller sections of the catalog and reduce the number of duplicates that result from each search.
If when you run the duplicate search Lightroom shows an error message complaining about 'fileAttributesAtPath' or 'rootFile', it's a strong indicator of a corrupt catalog.
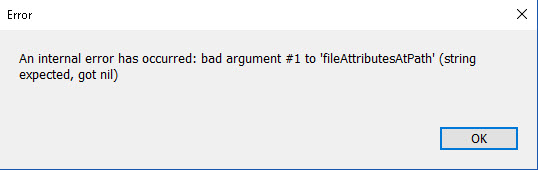
As a test, try running the search without the "Filename" option. If there is a problem in the catalog with filenames, then the error would appear when the plugin requests full filename details for photos. This may allow the search to finish, but would still leave the problem in the catalog. It isn't anything to do with files being offline or unavailable, it's a problem with the way that the filename is stored inside Lightroom's internal database.
If the catalog is damaged then there are a few options. The fastest would be to just export the entire catalog to a new catalog (File->Export as Catalog...) and use that from now on. That may work, depending on the type of problem. If that doesn't help then you would need to find the photo that's causing the problem, remove it from the catalog and re-import it. The fastest way to do this is to run the plugin on half your catalog and, if you still have the error, half of that and so on until you find the exact photo. There may be more than one.
The reason that this error is triggered by the duplicate finder is that it needs to access a lot of data about all your photos. Lightroom itself is unlikely to show a problem unless you actually select the damaged photos, and maybe even not then.
The first time you try to run the Duplicate Finder, it reports this error message:
An internal error has occurred.
?:0: attempt to index a nil value
This is almost always a sign that your catalog has some damage but don't panic, it's usually very easy to fix. You can see if this is the case by creating a new catalog, importing a small number of photos into it and then trying the Duplicate Finder there. If it works, then it proves that your main catalog has some damage.
The first thing to try is an optimise and repair. The "Optimize Catalog" option is on Lightroom's "File" menu. The repair is automatically done as part of a backup, so go to the Edit menu, then Catalog Settings, then change the "Backup Catalog" option to "When Lightroom Next Exits". Close Lightroom, re-open it and try the Duplicate Finder again. These options don't always work but they are worth trying as a first step.
If that didn't work then you can try backups, but there is a good chance that this problem has been there for a long time completely undetected so it may not help much. The most reliable solution is to create an entirely new copy of your catalog by selecting "All Photographs" and then the "Export as Catalog..." option on the File menu. You can keep your original catalog, of course, so there is no risk to doing this.
As a final option you can choose to identify the actual photo - or photos, because there may be more than one - which have the problem, remove them from the catalog, and re-import them. This is a longer process but if you don't want to create a new catalog then this is the best bet. Pick about half the folders in your catalog and run a duplicate search on those. If you see the error again, the problem is in that half. Now pick half of those and do it again, and so on until you get down to the actual photo that's got a damaged record. It is much faster to do than it sounds! In many cases, once you've worked out which photo is damaged, you can see exactly the same error message simply by selecting it in Lightroom's Library module.
The reason that this error is thrown up by the Duplicate Finder is that depending on what options you choose, it needs to access a lot of different properties of potentially every photo in your catalog. Lightroom doesn't notice that there is a problem until the photo or photos with the problem are accessed but, since the Duplicate Finder access almost everything, it is very likely to show these problems up if they do exist.
There’s a couple of reasons that the file size isn’t included as an option.
First, Lightroom gets the file size “on demand”, which means that for files that are missing or offline, such as on external disks or disconnected network volumes, the value simply isn’t available. This is probably not a huge deal for most people, but it would make the search unreliable in some cases.
The bigger reason is that it simply doesn’t add anything to the search.
All the other comparisons are for actual image data; even if the file is stored as separate raw, jpg and DNG copies, that data stays the same. File size is completely separate from file contents. Two random photos might well have the same file size, and two identical photos may have different file sizes. Lightroom is able to write data back to most kinds of file, and this will change the file size for two copies of a single photo too easily for a file size comparison to be of much use.
There’s a collection created during the search which will tell you which of a set of matches is largest and smallest.
Downloads
Duplicate Finder ManualWin7 Themepack Creator Manual
Alamy Manager Manual
Lightroom JPEG2000 Loader Manual
Backup Cleaner Manual
Link: http://www.lightroom-plugins.com/downloads/Backup%20Cleaner%20Manual.pdf
Link: http://www.lightroom-plugins.com/downloads/SoftProof%20Manual.pdf
Link: http://www.lightroom-plugins.com/downloads/Merge%20Titles%20Manual.pdf
Alamy
Missing UploadsThis has been reported to Adobe but I may not get a direct response. In the meantime, please take care if you are upgrading from Lightroom 2.6 to 2.7 on Windows.
Uploading to Alamy's servers works as expected for me (on Win7 64-bit) but not for some others. If you have upgraded to 2.7 and have tried uploading photos to Alamy please open a ticket so that I can track where the problem exists. It is as important to find out where uploads *do* work as where they don't. All I need to know is whether or not you've successfully uploaded anything to Alamy from Lightroom 2.7, and what exact version of Windows you're using including servicepack level if you know it.
You can still upload to Alamy using their uploader tool - the problem lies inside Lightroom, not with Alamy's server. The plugin will pick up these uploads the next time you use the "Fetch Metadata" function.
I apologise for any inconvenience but, since this appears to be a bug inside Lightroom, there is little that can be done to avoid it. With more information a workaround may become available so please do let me know if you are able to upload or not.
Alamy's server said '200'.
Part of the authentication mechanism is a cookie sent from Alamy's servers. If this cookie is not received, you will not be able to log in. This problem is caused by the Internet Explorer "Privacy" settings being set to "High".
To fix this you can reduce the Privacy settings to "Medium High" or lower, but this would affect all sites you visit. It is better to allow a one-off exception for alamy.com.
- In Internet Explorer, bring up the "Internet Options" dialog from the Tools menu. If no menus are visible, press the Alt button on your keyboard.
- Select the "Privacy" tab. The level will be set to "High" or higher.
- Click the "Sites" button.
- In the dialog that appears, enter "alamy.com" under "Address of website", and click "Allow".
- Close the two dialogs by clicking "Ok" on each.
You should now be able to connect to Alamy from Lightroom. You do not need to restart the PC, or even Lightroom.
"Alamy's server said 500".
The '500' is a standard HTTP error code meaning "internal server error". This is being returned by Alamy's web server. This usually happens while uploading images, but also sometimes during login.
If you receive this error, please check in your Documents folder for a file called "AlamyExport.log". In the case of a failed login, this will contain the actual server response as well as the "500" code. For example:
2010-05-06 11:07:29 +0200, TRACE	Fetch UserID using https://secure.alamy.com/logon.asp?returnurl=http://www.alamy.com/stock-photography-link-to-alamy.asp

2010-05-06 11:07:31 +0200, TRACE	Response received

2010-05-06 11:07:31 +0200, TRACE	Fallback on parsing HTML

2010-05-06 11:07:31 +0200, TRACE	Auth failed. Response =

2010-05-06 11:07:31 +0200, TRACE	<!DOCTYPE HTML PUBLIC "-//W3C//DTD HTML 4.0 Transitional//EN">

<HTML dir=ltr><HEAD><TITLE>The page cannot be displayed</TITLE>


...


      <H2 style="FONT: 8pt/11pt verdana; COLOR: #000000">500 Internal Server Error - The network logon failed. (1790)<BR>Internet Security and Acceleration Server</H2>

      </FONT></TD></TR></TBODY></TABLE></BODY></HTML>


2010-05-06 11:07:31 +0200, TRACE	(End response)

2010-05-06 11:07:31 +0200, TRACE	Server status: 500

2010-05-06 11:07:31 +0200, TRACE	Lightroom: 3.0

2010-05-06 11:07:31 +0200, TRACE	Headers:

2010-05-06 11:07:31 +0200, TRACE	Cache-Control = no-cache

2010-05-06 11:07:31 +0200, TRACE	Pragma = no-cache

2010-05-06 11:07:31 +0200, TRACE	Content-Type = text/html

2010-05-06 11:07:31 +0200, TRACE	Content-Length = 1731

2010-05-06 11:07:31 +0200, TRACE	status = 500

2010-05-06 11:07:31 +0200, TRACE	statusDes = internal server error
If you receive this error, please raise a ticket here but also with Alamy. This shows that their servers are overloaded or broken, and they should be advised as soon as possible. Send them the specific error message that appears in your AlamyExport.log, similar to the one highlighted in red above.
When you upload a photo to Alamy they assign a value called "Your Reference" which is normally the filename, minus the file extension. That is, a photo called "IMG12345.CR2" would have a "Your Ref" value of "IMG12345". They also assign an "Alamy Reference" value which is unique, and will be a short sequence of letters and numbers e.g. "A3FM0K".
To correctly identify which photo in Lightroom's catalog matches a photo in Alamy's catalog, the plugin will try to use an "Alamy Ref" if one has been assigned. The problem is that this value is assigned by Alamy after the photo has been uploaded, and so the first time you try and match the images Lightroom doesn't have this value. It must use the "Your Ref" value instead.
This raises lots of potential problems. In the simplest case, you have only one photo in your catalog which matches the "Your Ref". However, it is also common for people to have several photos with the same filename, for example as virtual copies or "IMG1234.DNG" from different cameras. Some people renamed all their photos after uploading them to Alamy, some may have several copies of the same photo in different folders (backup, working copy, original etc.).
To try and work round this problem, the plugin gives several options to try and help identify the correct photo. These are the rules it follows:
1) Search the catalog for any photo where the filename matches the "Your Ref" supplied by Alamy.
2) If there is no exact match (i.e. no matches, or more than one), then try to find a photo in the catalog where the "Alamy Ref" value matches the one supplied by Alamy.
3) For each photo that's been found by (1) or (2), remove any that don't match the keyword list in the Export dialog if that keyword list is not empty.
4) For each photo that remains in the list, remove any that don't match the Virtual Copy name in the Export Dialog if that name is not empty.
5) If more than one photo remains, see if one has a "Media Ref" value set. This is assigned by the plugin when you use it to upload photos to Alamy. If one does, assume this is the correct match.
6) All remaining photos have the Alamy data assigned to them.
This sequence means that under most circumstances, most photos are matched. For the ones that aren't, it is up to you to match them. If you check the HTML logfile after a Fetch operation, it will show which photos couldn't be matched and will provide a link to Alamy's website for the preview of that image. You can then use the normal Lightroom library tools to find the corresponding image in your catalog. To manually match the image, copy and paste the "Alamy Reference" value from Alamy's preview page into the "Alamy Ref" field in Lightroom's Metadata panel. To show the right section of the panel, select the "Alamy Plus" Metadata group; this shows the new Alamy data as well as the more common IPTC and EXIF fields.
Finally, if you have an image which you believe should be matched automatically but wasn't, please check in your "Documents" folder. This will contain a file called "AlamyExport.log" and, after a Fetch, this will show many details of the Fetch process which will help to find out why the photo wasn't matched.
When the plugin uploads an image, it stores the Alamy Media Reference in the submitted photo's metadata as an indication that it has been submitted. This is done for two reasons; first, it allows you to check which photos have been submitted. Secondly, the Media Reference is used when matching photos during the metadata download under some circumstances.
The "Media Reference" is not the same as the "Alamy Reference". The "Media Ref" is the same for each photo in each uploaded batch, and will typically be "OL#####". The "Alamy Ref" is unique to each picture.
The plugin will refuse to re-submit a photo if either the "Alamy Ref" or the "Alamy Media Ref" values are set. Clearing these is simple; select the photo or photos you want to re-submit and just erase the contents of those two fields using the Library's Metadata panel. They will be visible if you use the "Alamy" or "Alamy Plus" presets.
Part of the Alamy plugin for Lightroom is a file which tracks your Alamy pseudonyms. Lightroom keeps track of the versions of this file, and if you transfer your Lightroom catalog to a new machine or reinstall Lightroom from scratch, your Pseudonym file will appear to be older than the catalog and Lightroom will complain. Normally the plugin will be able to repair this on its own, but sometimes it needs some help.
To repair this, follow these steps:
- Download an empty Pseudonym file from here.
- Find the existing file. The easiest way to do this is using Lightroom's Plugin Manager. Select the Alamy plugin and expand the "Status" panel on the right. It will tell you the full path to the plugin, and there is also a button for "Show in Explorer" or "Show in Finder". On the Mac you will need to show the plugin's files using the "Show Package Contents" item on the Finder menu.
- Replace the file called "addPseudonyms.lua" with the empty one you downloaded in step 1.
- Start Lightroom. If it requests another restart, do so. Then, run a Metadata Fetch export; it will re-download your pseudonyms and request that Lightroom is restarted (again!).
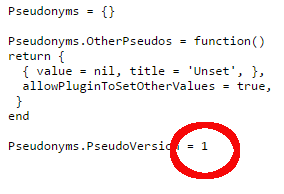
- If it still complains that the database is newer, open the new AddPseudonyms.lua file inside the plugin folder. It contains a version number; change this to a higher number, say 15 to start, and try again. Keep adding 5 or 10 until it is accepted. This version number is related to the number of times you have changed your pseudonyms, so it will be different for everyone.
Your pseudonym file should now be repaired.
When you upload a new photo, the plugin will add as much of the standard metadata as it can to the JPEG. This covers the majority of the fields, specifically those which map directly to an IPTC metadata field. This is because the file that gets sent to Alamy is just that - a standard JPEG - and there is no way to send the Alamy-specific metadata at the same time.
On upload, Alamy accept it provisionally and only assign it a unique reference number and add it to their catalogue after it has been accepted by their QA. At this point they should email you, and you can now use the "Fetch Alamy Metadata" function to get their unique identifier for your photo. Now, Lightroom knows how Alamy refer to your photo and you can exchange the other metadata.
You can now use the "Set Alamy Metadata" function to send all the Alamy-specific metadata fields such as Essential and Main keywords, model release etc. At any point from now on you can use the Set or Fetch functions to synchronise the metadata, no matter whether you use Lightroom or Alamy's online tools to edit it.
Alamy allow you to define many "pseudonyms" when you upload photos. This can be a useful way of separating different types of photography in Alamy's search functions.
For technical reasons, the Alamy-Lightroom Bridge needs to store these in a file on disk instead of in Lightroom's catalog. If this file is missing or damaged, the plugin can be prevented from working correctly. Normally if this happens, the plugin will rebuild the file itself the next time you start Lightroom.
If you have this problem repeatedly, please let us know. However, always let the plugin try to rebuild the file itself first. As long as it is able to connect to Alamy's servers, it should be able to rebuild it.
If you want to force a rebuild, possibly because you think the file is damaged or the pseudonyms listed in Lightroom's "Details" panel are incorrect, you can use the "Clear Pseudonyms" button in Lightroom's Plugin Manager. This will force the plugin to begin an automatic rebuild; again, you will need to restart Lightroom at least once and possibly twice for the file to be rebuild.
Please only report this as a problem if the plugin has been unable to rebuild the file after restarting Lightroom at least twice!
There are options in the "Fetch Metadata" function to require photos to be part of a particular collection, or to exclude them if they are not part of a particular collection. If you set these filters to be one of the supplied Smart Collections, they may not work as you expect.
Smart Collections are usually updated in realtime so, as the results are being applied, the content of the smart collection may change. It can also happen that sometimes the contents of the Smart Collections lag behind these changes. In short, using a smart collection as a filter in the Fetch Metadata dialog may misbehave if the smart collection depends on the Alamy metadata being downloaded.
A simple workaround for this is to create a temporary, static collection based on the contents of the Smart Collection. The contents of this will not change during the download, and you can remove the collection afterwards.
When you import a CSV with the Alamy-Lightroom Bridge, it needs some key information to allow it to understand what changes to make to which photos. The CSV should have a header row with at least one of these columns:
- Filename
- Path
- ImageRef
In addition, any other columns that are recognised will be used to actually set the data. The easiest way to find out what columns are used is to export a CSV and use that as a template.
It is also possible that the CSV file is incorrect in some way. If this is the case then the plugin should give you a clear error message saying what the problem is, and on what line of the CSV file, to allow you to manually correct the file.
The Alamy-Lightroom Bridge needs to authenticate itself with Alamy's servers if it is to do any work on your behalf. This means it needs to have your Alamy account name and password entered correctly in Lightroom's Plugin Manager.
If either of these is empty, or not correct, then of course the plugin will not be able to authenticate with Alamy.
Another possibility for not being able to authenticate are simple network problems. You can easily check by using a normal web browser and logging in to Alamy's website. Make sure that you use the same account name and password in both cases, instead of simply accepting any values that might be stored by your browser. It is easy to forget to update stored passwords!
The Alamy-Lightroom Bridge downloads a CSV file containing your sales data when you use the "Check for Sales" feature. This file would normally have certain data columns defined. If it doesn't, it could be a temporary network or Alamy server problem. As a first attempt to fix this, simply wait a while and try again.
If you get an error message saying that the sales CSV doesn't contain the right data then it is likely that Alamy have updated their CSV format and removed a column that the plugin expects to see. This hasn't happened so far and it is unlikely to in the future, but it is still possible. In this case, the plugin will need to be updated. Please let us know about the problem in case we haven't come across it ourselves.
When you use the plugin to send new photos to Alamy using the "online upload" method, it tries to allocate a new "upload session" in exactly the same way as Alamy's own online tools do.
Errors here should be extremely rare and will usually be down to a simple networking problem, so as a first step, please just wait a while and try again. If you can log in to Alamy's website in a normal browser, the Alamy-Lightroom Bridge should be able to get a new upload session ID.
If this fails repeatedly, please let us know with as many details as you can provide, ideally including a screenshot of the actual error message and the plugin's log file from your "Documents" folder.
The Alamy-Lightroom Bridge needs to send data to Alamy's servers and, in the case of new images, this can be very large and take a long time. On a slow or unreliable network connection, it is possible for there to be problems during this upload. Even when you are only uploading new metadata, the same problems can happen.
The simple fix for this is to try again later, or on a more reliable network.
Videos
Alamy Manager (Video)Link: http://www.youtube.com/watch?v=G-woeIiahNk
Licenses
Why do I need to renew my license if it has expired?You only need to renew if you want to download and use a new version of the software, and your existing free update period has expired. Paying a small amount like this for new versions helps to pay for the work on the updated software.
If you don't want to use a new version, there is no need to renew your license.
You don't need to pay to renew your license if you just want to continue using the same version of the software that you already have.
In newer plugins, the last day of the free update period is shown in Lightroom's Plugin Manager for Lightroom plugins. When you use the "Check for Updates" function, you will be told whether the software was released after this date or not.
Older plugins will not be able to show this information, but you can check in the Helpdesk what the exact details of your license are. To do this, log into the helpdesk and visit the Licenses section.
If you want to keep using the version you already have, then there is nothing to do. The replacement license is only going to be useful if you download and install newer versions.
When you upgrade the software to a newer version, you will need to enter the new license if that version was released after March 1st 2015.
If you want to download a new version of the software which was released after the end of your free update period, you will need to renew your license.
To do this, you will need to log into the helpdesk using the same email address that owns the license, and then visit the Licenses section. Once there, select the license that you would like to renew and click "Get License". The renewal price will be considerably lower than the initial purchase price.
No.
If you bought a license then you are entitled to use the version of the software that you paid for, indefinitely. You can also upgrade to all new versions released in the following year, for free.
The only time you need to renew a license is when you want to use a version of the software that was released more than a year after the one you originally bought.
If you can't remember your license details, you can retrieve them yourself by using the License Manager in the helpdesk. Log in using the email address that owns the license and visit the "Licenses" section. All licenses you own will be listed here, so you can simply copy and paste the details.
If you don't know your password for the helpdesk, you can retrieve that automatically too, using the "Lost License" link.
SoftProof Plugin
Missing Profiles for SoftProofWindows:
Mac:
~/Library/ColorSync/Profiles
/Library/ColorSync/Profiles
/System/Library/ColorSync/Profiles
By default it shows only those profiles that are marked as belonging to a printer. You can choose to show all profiles by un-ticking the "Output Only" tickbox, to the right of the drop-down list of profiles.
It may be that the profiles are only currently available to the printing system in MacOS X, but not available for applications to use. This article from Epson, although written for the R360, would be relevant to many other printers:
http://www.epson.co.uk/Printers-and-All-In-Ones/Inkjet/Epson-Stylus-Photo-R360/Drivers-Support?target=article&extn=.html&articleId=1974
If you disable white-point simulation, the gamut warning tickbox should be enabled.